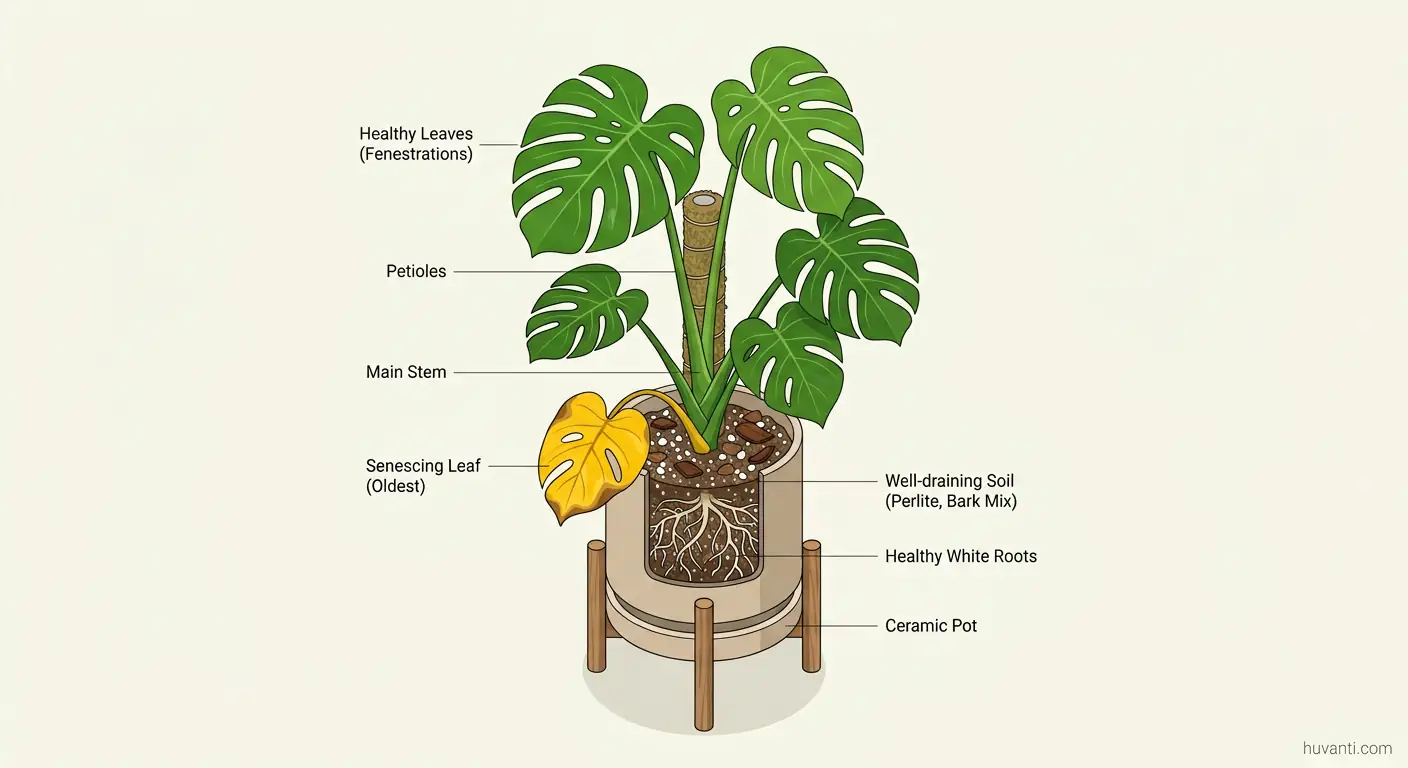
You didn’t soak your Monstera, yet a leaf went yellow. Frustrating. I get it. The good news is yellow leaves always tell a story, and you can read it once you know the clues. In this guide, I will tell you the 9 most common reasons a Monstera leaf turns yellow even when you haven’t overwatered, plus the exact fixes and simple prevention steps that keep your plant lush.
You will learn why monstera yellow leaf but not overwatered, how to tell normal aging from a real problem, how to check roots and soil quickly, what light your plant actually wants, how to fix nutrient issues without guesswork, and the fastest way to stop a downward spiral. Everything here is for educational and informational purposes only and geared to be practical, readable, and ready to use today.
Table of Contents
Quick Diagnosis: 10-Minute Checklist
Start here. Work top to bottom, then jump to the matching section for details and fixes.
- Is only the oldest, lowest leaf yellowing, with no spots and the rest of the plant looks great? That is normal aging. Trim it and move on.
- Is the pot light as a feather and the soil pulling from the sides, water beading on top? That is dry soil that turned water-repellent. See Cause 1.
- Are you more than 1 to 2 meters away from a bright window, or buried behind curtains or shelves? That is low light. See Cause 2.
- Did it sit in strong direct sun for hours, especially midday, and now has pale patches or crispy areas? That is light scorch. See Cause 3.
- Do older leaves fade evenly from green to yellow, especially the lowest ones, while new growth looks smaller? That is likely nitrogen hunger. See Cause 4.
- Do new leaves look pale with green veins, or yellow quickly while older leaves stay greener? That suggests iron or magnesium issues, often with high pH or salt buildup. See Cause 4.
- Is the plant tight in the pot, roots circling or pushing up, water racing straight through, growth stalling? That is root-bound stress. See Cause 5.
- Does the soil stay wet forever on the bottom and bone dry on top, or smell stale even though you don’t overwater? That is a compact or poorly aerated mix. See Cause 6.
- Has the room dropped below 15°C at night, or does a vent or draft hit the leaves, or is air bone dry in winter? That is temperature or humidity stress. See Cause 7.
- Do you see silver speckles, sticky residue, crawling dots, webbing, or thin streaks on leaves? That is pests. See Cause 8.
- Are there round spots with yellow halos, water-soaked patches, or blackened edges that spread from one leaf to another? That points to leaf spot or a root problem. See Cause 9.
When Yellow is Normal and When It Isn’t
Monsteras shed the odd oldest leaf. If only 1 old leaf at the bottom fades to yellow while new leaves are healthy and richly green, you are looking at normal turnover. Trim it at the base and celebrate new growth.
It isn’t normal if several leaves yellow in a row, if new leaves come in pale, if there are spots, halos, streaks, or a sudden change after you moved the plant. If any of those show up, head to the causes below.
The 9 Causes of Yellow Leaves Without Overwatering
Cause 1: Underwatering or Dry, Water-Repellent Soil
What it looks like
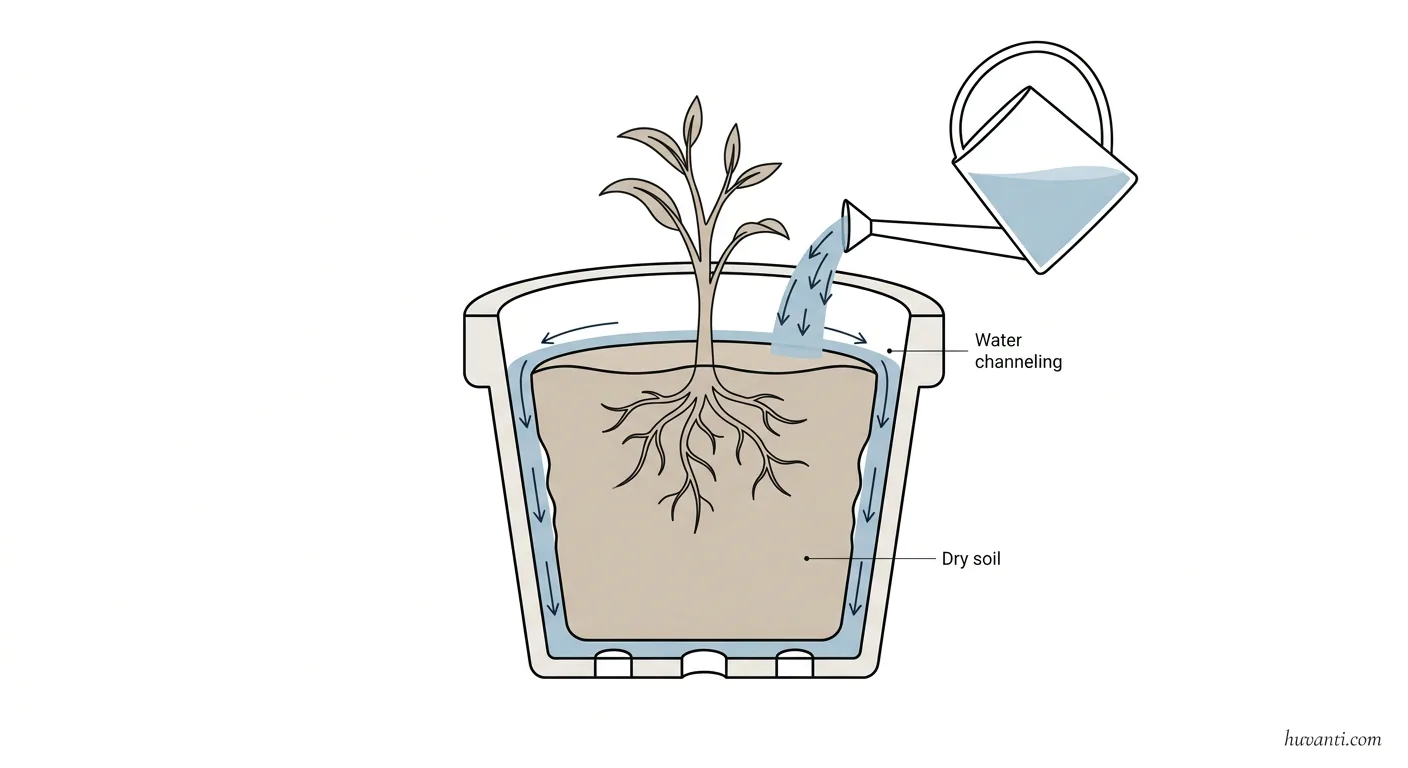
- Soil pulls away from the pot; water runs down the sides and straight out.
- Pot feels very light; leaves droop, edges crisp, yellowing starts at the tips or edges of older leaves.
- After you water, leaves perk up, but yellowed parts don’t turn green again.
Why it happens Peat and coco mixes can turn water-repellent when they dry hard. So even if you do pour water, it doesn’t rewet the root zone. Roots get drought stressed and drop older leaves first.
Quick fix
- Bottom soak. Place the pot in a tub or sink with water reaching a third to halfway up the pot. Soak 15 to 30 minutes until the top is evenly moist. Drain fully.
- Light trim. Remove fully yellow leaves at the node to redirect energy to healthy foliage.
Prevention
- Water by the soil, not the calendar. Let the top 3 to 5 cm dry, then water slowly until a little runs out.
- Add chunky material to the mix so it rewets easily. Bark and perlite help.
- When soil goes dry, prime with a small pour, wait a few minutes, then finish watering. This stops channeling.
Cause 2: Not Enough Light
What it looks like
- Slow growth, small new leaves, long gaps between leaves on the stem.
- Lower leaves yellow over time, sometimes with slight droop that never fully lifts.
- Little to no fenestration on a species that normally splits with more light.
Why it happens Monsteras want bright, indirect light. Far from a window, light can be one-tenth of what the plant needs, even if the room looks bright to your eyes.
Quick fix
- Move it closer to a bright window. East is great. South or west is fine if you set it a step back from direct sun.
- Rotate the pot a quarter turn each week for even light.
- If your home is dark, add a simple LED grow light set to 12 to 14 hours daily.
Prevention
- Keep the plant within about 1 to 2 meters of a bright window with sheer light or morning sun.
- Dust leaves monthly. Clean leaves capture more light.
Cause 3: Too Much Direct Sun or Sudden Light Change
What it looks like
- Pale yellow patches on the side facing the window, sometimes with tan or brown crispy spots.
- Yellowing that follows a move to a sunnier spot or the start of summer.
Why it happens Leaves grown in low to medium light aren’t ready for intense rays. A sudden jump to strong direct sun can bleach chlorophyll and burn tissue.
Quick fix
- Pull the plant back from the window or add a sheer curtain.
- Remove only fully dead tissue. Partially damaged leaves still photosynthesize.
Prevention
- Acclimate over 2 to 3 weeks. Give a little more light every few days.
- Offer morning sun rather than harsh midday rays, especially in summer.
Cause 4: Nutrient Gaps or Salt Buildup
What it looks like
- Uniform yellowing of older leaves first points to a nitrogen gap.
- Yellowing between veins on older leaves suggests magnesium need.
- New leaves that yellow with green veins hint at iron not reaching the plant, often from high pH or salt lockout.
- Brown tips and edges with dull yellowing can come from fertilizer salts building in the pot.
Why it happens Soilless mixes hold few nutrients. Tap water minerals and frequent feeding can raise salts and pH, which ties up iron and other elements.
Quick fix
- Flush the pot. Run clean water through until it drains clear. Aim for 3 pot volumes.
- Feed lightly. Use a balanced liquid fertilizer at quarter to half strength every 2 to 4 weeks during active growth.
- For interveinal yellowing on newer leaves, add a chelated iron drench once and observe new growth.
- For interveinal yellowing on older leaves, add magnesium with Epsom salt at 1 teaspoon per 2 liters of water once, then reassess in 4 to 6 weeks.
Prevention
- Keep pH in the mildly acidic range. Aroid mixes are usually fine. Avoid heavy lime sources.
- Don’t overdo fertilizer. Light regular feeding beats big blasts.
- Every 2 to 3 months, flush the pot to clear salts, especially if you use hard tap water.
- If your tap water is very hard or chloraminated, consider a carbon filter or mix tap with distilled.
Cause 5: Root-Bound Stress
What it looks like
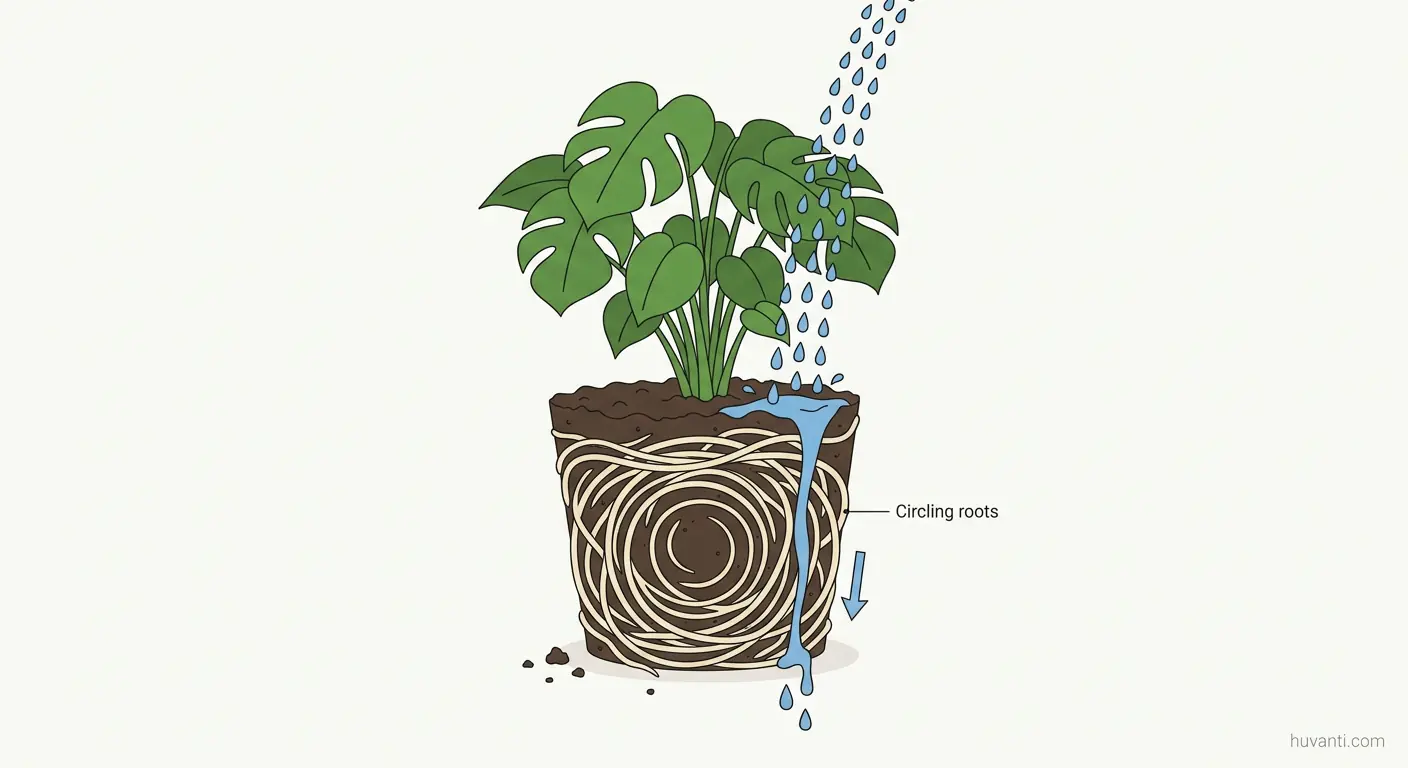
- Roots circling the pot, poking from the drain hole, or pushing the plant upward.
- Water speed runs through without soaking the soil.
- Growth stalls, yellowing starts on older leaves, petioles weaken.
Why it happens Roots need space and air. When they hit the pot edge and coil, they struggle to absorb water and nutrients evenly.
Quick fix
- Check roots. Slip the plant partly out of the pot. If roots are dense and circling, it is time.
- Up pot one size. Pick a pot 2 to 4 cm wider than the old one with a real drain hole.
- Tease apart tight roots gently. Remove only a little old mix if roots are fragile.
- Water well once after repotting to settle the mix.
Prevention
- Repot every 1 to 2 years or when growth slows and watering becomes tricky.
- Use a chunky aroid mix that keeps air around roots.
Cause 6: Heavy, Compacted, or Airless Soil
What it looks like
- Top dries fast but lower layers stay wet for days.
- Soil smells stale even though you water modestly.
- Yellowing starts at lower leaves, sometimes with brown patches, and the plant looks dull.
Why it happens Dense mixes limit oxygen at the root zone. Even without frequent watering, roots can suffocate. A cachepot that traps runoff makes it worse.
Quick fix
- Improve aeration. Gently poke a few holes through the soil with a clean chopstick to increase airflow until you can repot.
- Repot into a free-draining, airy mix. See the recipe below.
- Empty decorative covers after each watering so the pot doesn’t sit in a puddle.
Prevention
- Build the right mix. For Monsteras, air is as important as moisture.
- Water slowly and evenly so the whole profile gets moist, then allow the top to dry before the next cycle.
Cause 7: Temperature Swings and Low Humidity
What it looks like
- Yellowing with brown tips or edges after a cold night or sudden draft.
- Leaves near vents or doors suffer first.
- In dry winter air, tips crisp, then the leaf yellows.
Why it happens Monsteras are tropical evergreens. Chilly nights, cold drafts, or very dry air stress cells and can trigger chlorosis and leaf loss.
Quick fix
- Move the plant away from vents and exterior doors.
- Aim for a room that stays near 18 to 27°C and doesn’t dip under 15°C.
- Raise humidity to around 50 percent with grouped plants, a tray with pebbles and water under (but not touching) the pot, or a small humidifier.
Prevention
- Avoid big swings. Monsteras like steady conditions.
- In winter, give a touch less water and feed lightly, since growth slows in cool, short days.
Cause 8: Pests
What it looks like
- Thrips leave skinny pale streaks and yellow patches, often on the newest leaves. You may catch a few on blue sticky cards.
- Spider mites make fine webbing and tiny yellow speckles that merge into larger faded areas.
- Scale and mealybugs cause sticky residue and yellowing around feeding spots.
Why it happens Pests tap sap and inject enzymes that damage cells. The plant responds with chlorosis and tissue loss.
Quick fix
- Isolate the plant from others.
- Wash leaves top and bottom with a gentle shower or a damp cloth.
- Spray with insecticidal soap or horticultural oil, reaching leaf undersides and petioles. Repeat every 7 to 10 days for 3 rounds to catch life cycles.
- For stubborn thrips, rotate to a product with spinosad for one cycle, following the label exactly. Use in a ventilated space.
Prevention
- Quarantine new plants for 2 to 3 weeks.
- Inspect weekly, especially the underside of leaves and the newest growth.
- Keep leaves dust-free. Clean leaves are easier to inspect and less hospitable to pests.
Cause 9: Disease or Root Trouble That Isn’t From Overwatering
What it looks like
- Yellow leaves with dark lesions or halos point to leaf spot, either fungal or bacterial.
- Yellowing with limp petioles and dull, gray-green foliage can indicate root distress even if you water carefully.
- A sour or swampy smell from the pot is a warning sign, though not every case has odor.
Why it happens Pathogens travel on tools, soil, and even in splash. Poor airflow, crowded leaves, and compact media invite trouble. A plant can inherit early root issues from a nursery or previous care and show symptoms later.
Quick fix
- Prune affected leaves with clean shears. Disinfect blades between cuts with alcohol.
- Improve air movement around the plant. Space leaves and avoid wet leaves at night.
- Water only at the soil line and early in the day.
- Repot into fresh, airy mix if you suspect root decline. Trim only mushy, brown roots. Keep healthy white or tan roots.
Prevention
- Sterilize pots and tools.
- Don’t reuse old, questionable soil.
- Avoid splashing leaves when you water. Bottom water if needed.
- Keep the canopy thinned so air can pass through.
The Right Monstera Potting Mix
A simple aroid mix that drains well, holds some moisture, and stays airy helps prevent both dry pockets and airless zones. Here is a reliable recipe you can tweak based on your home’s conditions.
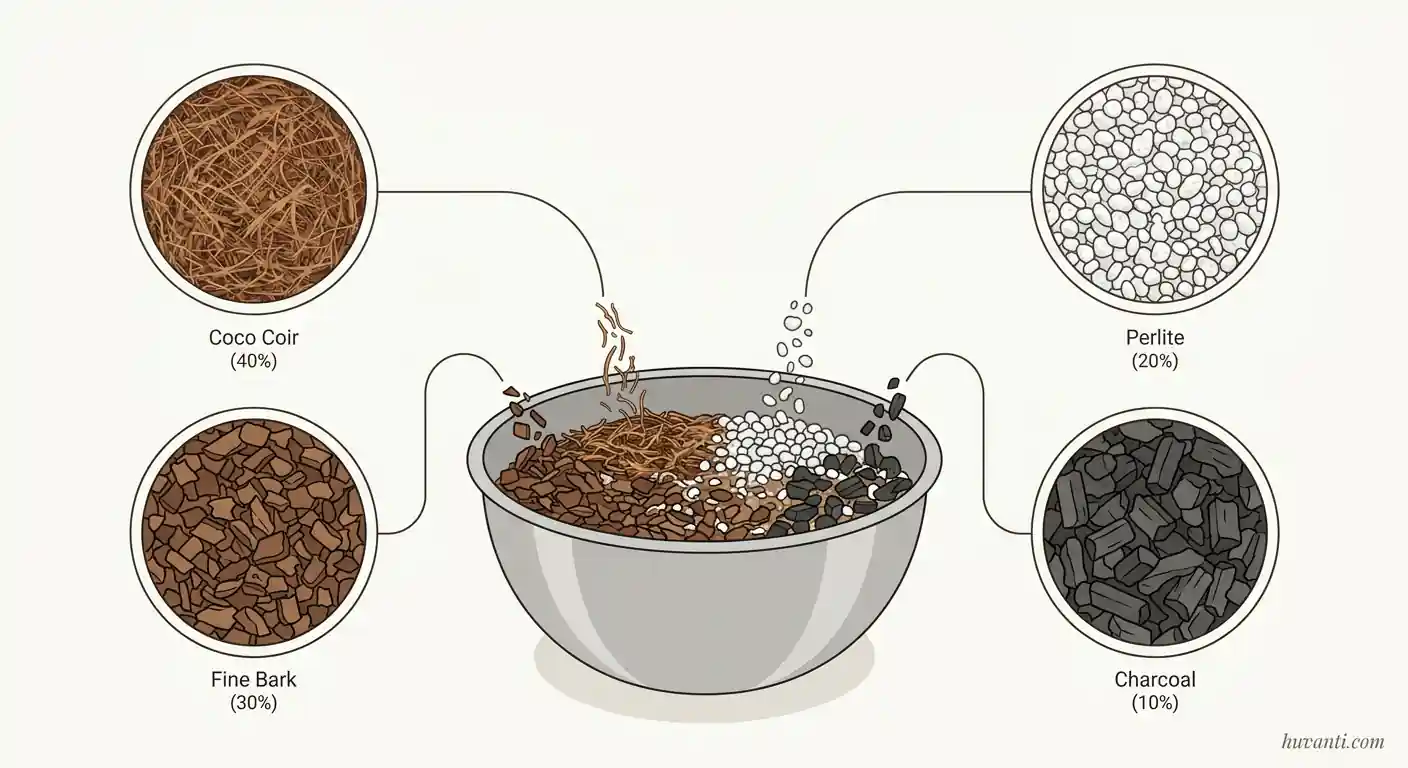
- Coco coir or high-quality peat: 40 percent
- Fine bark for orchids: 30 percent
- Perlite or pumice: 20 percent
- Horticultural charcoal or coarse sand: 10 percent
Optional extras
- A handful of worm castings for mild nutrition
- A small amount of sphagnum moss for plants in very dry rooms
Test the mix in your hand. Water should pass through freely; the handful should hold shape when squeezed but fall apart with a poke, and it should smell clean.
How to Water So Yellowing Doesn’t Creep Back
- Check moisture with your finger 3 to 5 cm down, or use a wooden chopstick pushed deep in the mix. If it comes out clean and dry, water. If it is damp and cool, wait.
- Water slowly in circles to wet the entire profile, not just one side.
- Stop when you get a modest amount of runoff and empty any saucer or cover pot after a few minutes.
- In warm, bright months you may water weekly. In cool or low light months, it might stretch to every 10 to 21 days. The plant sets the pace.
Light That Keeps Your Monstera Deep Green
- East window with gentle morning sun is ideal.
- South or west windows work if you set the plant back a step and diffuse harsh rays with a sheer curtain.
- North windows can be fine if you are close to the glass and the view is open. If growth stalls, add a grow light set to a soft, bright level rather than blazing intensity.
A quick rule of thumb: If you can read a book comfortably without turning on a lamp in the spot at midday, you are close. If you need a lamp by early afternoon, the plant is probably light-starved.
A Simple 72-Hour Rescue Plan
If several leaves turned yellow at once and you want a clear path forward, do this.
Hour 0 to 1
- Inspect leaves for pests. Wipe both sides with a damp cloth.
- Trim fully yellow or brown leaves at the base.
- Check roots. Slip the root ball partly out. If it smells foul or looks dark and mushy, repot right away. If roots look pale and firm, return to the pot.
Hour 1 to 24
- Reset moisture. If soil is very dry, bottom soak. If soil is dense and heavy, aerate gently and let it breathe.
- Move to bright, indirect light. Avoid harsh sun.
Hour 24 to 48
- If you saw no pests, feed lightly at quarter strength.
- If you did see pests, begin your spray cycle and keep the plant a little drier between waterings while it recovers.
Hour 48 to 72
- Set a reminder to check moisture and rotate the pot weekly.
- Take a photo now. Compare new growth in 2 to 4 weeks rather than watching the damaged leaves, which won’t heal.
Should You Cut Off Yellow Leaves?
Yes, when a leaf is more yellow than green, it won’t recover. Remove it cleanly at the node. If a leaf is only slightly yellow at the tip or edge but is mostly green, leave it. It still feeds the plant.
Common Myths That Waste Time
- Bananas or coffee grounds in the pot fix yellow leaves. They don’t. They can attract pests and throw off soil balance.
- More water helps every yellow leaf. It can make things worse if the issue is light, cold, salt buildup, or pests.
- A big pot prevents stress. Oversized pots can hold too much moisture in the lower zone and starve roots of air.
Seasonal Notes for 2026
Indoor humidity and light change more than you think across seasons. Smart home vents, double glazing, and strong summer sun all matter.
- Spring to summer: Growth speeds up. Feed lightly; watch for thrips and mites as windows open.
- Mid-summer: Increase shade or sheer curtains for south and west windows. Heat stress plus hard light can yellow leaves fast.
- Fall to winter: Light drops and air dries. Move the plant closer to windows, prune lightly for airflow, and water less often but more evenly. Humidify if tips crisp.
Troubleshooting by Leaf Pattern
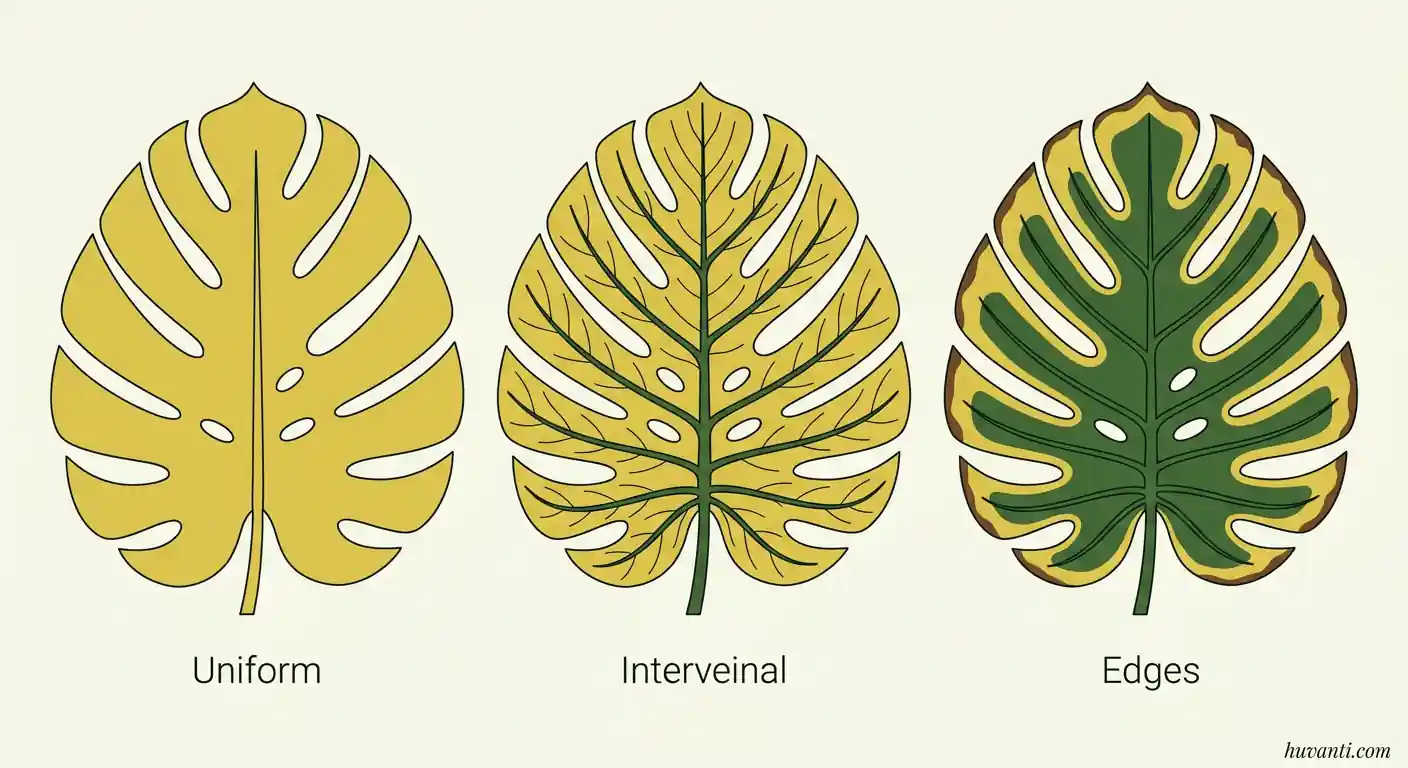
Uniform yellowing on older leaves
Think nitrogen or natural aging. Feed lightly if several leaves join in.
Yellowing between veins on older leaves
Think magnesium. Try a small Epsom salt dose once.
Yellow new leaves with green veins
Think iron not available. Flush salts, use a chelated iron drench once, and bring pH down gently by switching to a peat or coco-based aroid mix.
Yellow blotches with brown centers
Think light scorch or leaf spot. Match with your window conditions. If the blotch spreads with halos, prune and improve airflow.
Edges yellow first then crisp
Think salt buildup, dry air, or chronic underwatering. Flush salts and reset your water routine. Raise humidity.
Preventive Care Checklist
Weekly
- Check moisture and rotate the pot.
- Wipe dust from leaves.
- Quick pest scan, especially the newest leaves.
Monthly
- Flush the pot with clean water unless you already watered very deeply that month.
- Light fertilization during active growth.
- Prune stray vines to keep airflow through the canopy.
Yearly
- Refresh the top few centimeters of mix or repot if roots fill the pot.
- Deep clean the pot and saucer. Sanitation prevents disease.
Final Thoughts
A yellow Monstera leaf doesn’t mean you failed. It is a signal. Once you match the pattern to the cause, the fix is usually simple. Start with light and soil, then work through moisture, nutrients, and pests. Swap dense mix for an airy one, bring the plant into bright indirect light, feed lightly, and keep conditions steady. Remove leaves that are fully yellow, and watch the next two leaves. That new growth is your scorecard.
Use this as your playbook whenever you see a Monstera yellow leaf but not overwatered. The steps help you solve the immediate issue and set up a routine that prevents repeat trouble. Clean water, bright gentle light, an airy mix, and calm conditions do most of the heavy lifting. Your plant will tell you when it is happy. You will see deeper green, stronger petioles, and bigger, more dramatic leaves.
Frequent Asked Questions
Why does only one old Monstera leaf turn yellow at a time?
That is normal aging. The plant sheds the oldest leaf as it pushes new growth. Trim it at the base and watch the newest leaves for health. If several old leaves go at once, look for light or nutrient gaps.
Can hard tap water make Monstera leaves yellow?
Yes. Hard water adds calcium and other minerals that build up in soilless mixes and can tie up iron and magnesium. Flush the pot every couple of months and consider a carbon filter or a mix of tap and distilled.
Do yellow Monstera leaves ever turn green again?
No. Once a section turns yellow, those cells lost chlorophyll. Keep mildly damaged leaves if they are mostly green. Remove fully yellow ones.
How close should my Monstera be to a window?
Within about 1 to 2 meters of a bright window is a good range. East is ideal. For south or west, add a sheer or set the plant a step back to avoid harsh rays.
How often should I fertilize a Monstera indoors?
During active growth, feed lightly every 2 to 4 weeks with a balanced liquid at quarter to half strength. In low light or winter, feed monthly or pause until growth resumes.
My Monstera is root-bound. Should I jump several pot sizes?
No. Move up one size, about 2 to 4 cm wider. Big jumps keep the lower mix wet for too long and can stress roots.
What is the best soil for Monstera to avoid yellow leaves?
A chunky aroid mix that drains well yet holds some moisture. Try about 40 percent coco or peat, 30 percent fine bark, 20 percent perlite or pumice, and 10 percent charcoal or coarse sand.
How do I know if pests are the cause of yellowing?
Look for fine speckles, pale streaks, webbing, sticky residue, or tiny insects on the undersides. Use a magnifier or your phone zoom. If you see any of these, begin a wash and spray cycle and isolate the plant.
Should I mist my Monstera to stop yellowing?
Misting gives a brief humidity bump and can spread disease if leaves stay wet. It is better to raise room humidity with grouped plants, a tray with pebbles, or a small humidifier.
I corrected light and water, but yellowing continues. What now?
Flush the pot to clear salts, feed lightly, and inspect roots and pests again. If the mix is heavy or roots are cramped, repot into a fresh, airy mix. Give the plant 2 to 4 weeks; improvements show in new growth, not old leaves.