Your peace lily looks sad, the leaves are limping, and yet the potting mix is clearly moist. That mismatch is a clue. When a peace lily droops while the soil is wet, the roots often can’t breathe or can’t move water to the leaves. The good news is you can read the signs, fix the cause, and get the plant perking up again.
Here is what you will learn:
- How to tell if the plant is waterlogged or struggling for another reason
- The 9 most common causes of droop with wet soil
- Simple, step-by-step fixes you can do right now
- How to set up a routine that prevents future drooping
- Clear answers to the most asked questions about peace lily drooping but soil Is wet
I will keep each step practical and easy to follow so you can move from problem to progress today.
Table of Contents
The Quick Answer
Wet soil plus drooping almost always points to low oxygen around the roots, weak or rotting roots, or conditions that slow transpiration like low light or cold. Start by checking drainage and roots. If roots are brown and mushy, repot into an airy mix and trim the rot. If roots are white and firm, improve light, warmth, and airflow, then adjust watering so the top portion of the mix dries before you water again.
Expect mild cases to perk up within 24 to 72 hours after you correct the cause. Severe root issues can take a few weeks to rebound.
Fast 60-Second Triage
Do this quick checklist before you make any big changes.
- Press the potting mix with two fingers. Is it soggy or just evenly moist?
- Tip the pot and check the saucer. Is water pooled under the pot?
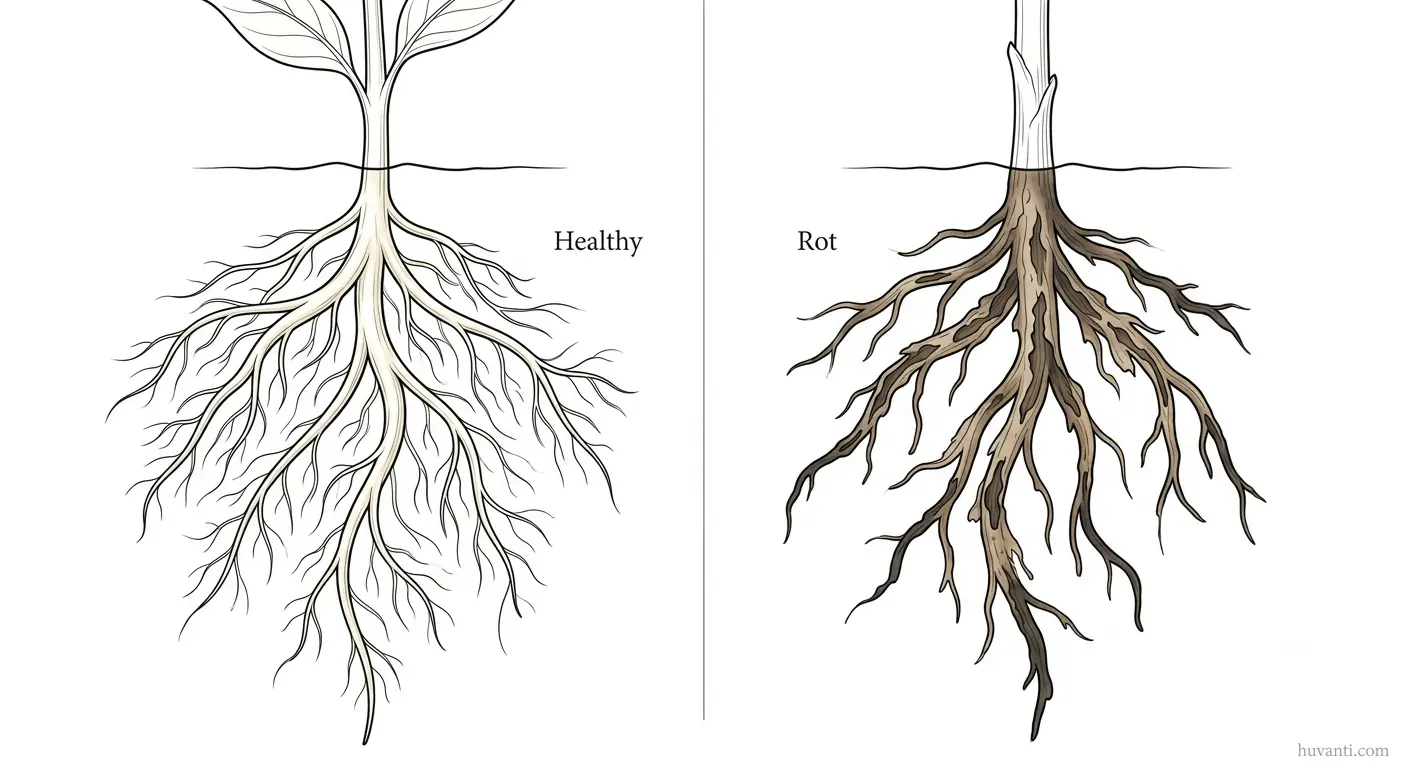
- Slide the root ball halfway out. Do you see white, firm roots or brown, soft roots that smell funky?
- Look under the pot. Are drainage holes clear or clogged?
- Check the spot. Is the plant in low light or right in an air conditioner draft?
- Feel the leaves. Are they limp and cool to the touch from cold air or cold water?
- Think about the last 2 weeks. Any heavy feeding, softened water, or a big move to a darker spot?
If you find brown, mushy roots, jump to the rescue steps in the section called Emergency Root Rescue. If roots look healthy, go straight to the 9 causes and fixes.
What Wet Really Means for a Peace Lily
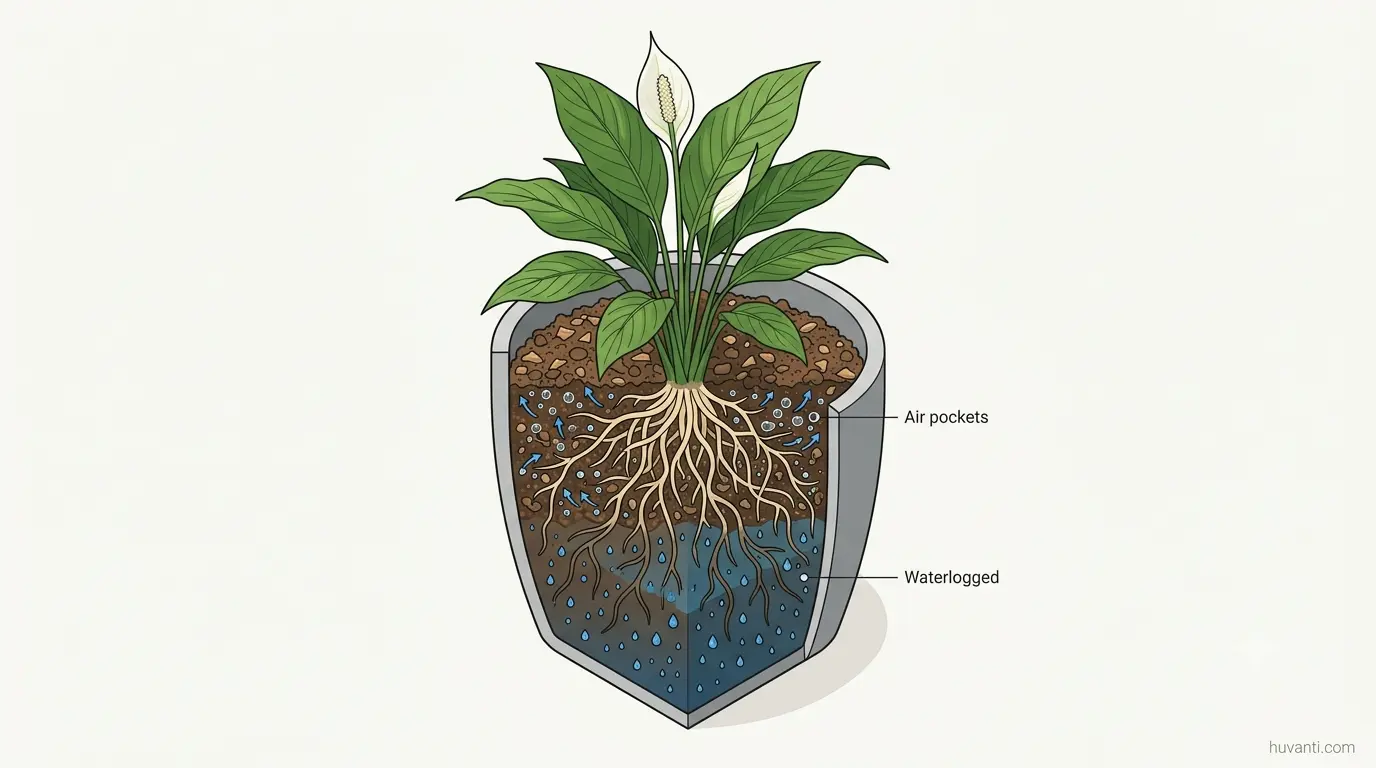
Soil can be wet at the top but still oxygen-rich inside, or the top can look dry while the core stays waterlogged. You want the mix evenly moist with air pockets, not saturated.
Use these quick tests:
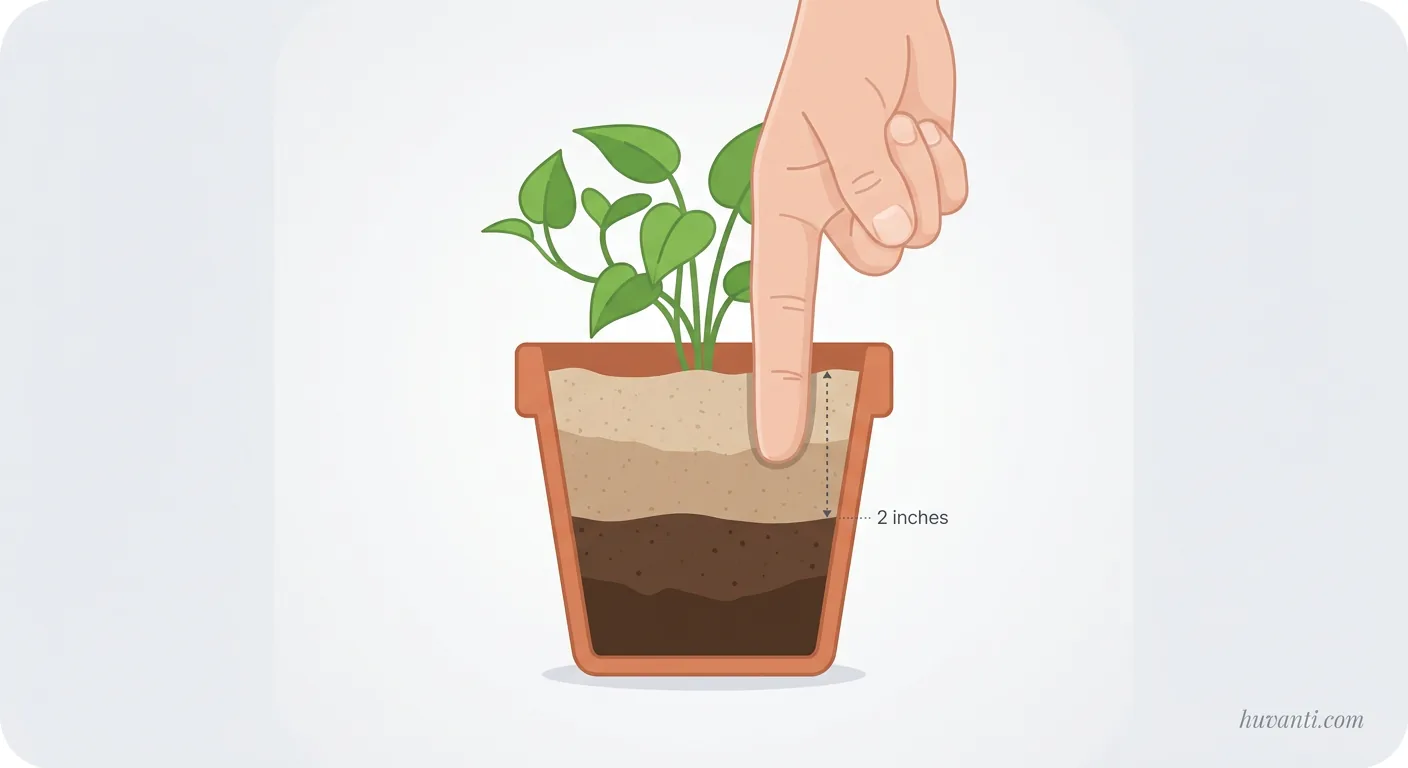
- Finger test: Insert a finger 2 inches deep. If it feels wet and cool, wait to water. If the top 1 to 2 inches are dry and the lower layer is slightly moist, that is perfect.
- Skewer test: Push a bamboo skewer to the bottom. If it comes out with heavy mud, it is waterlogged. If it shows a damp band only on the lower half, that is fine.
- Pot weight: After a full watering, lift the pot and note the heavy weight. Check again daily. Water when the pot feels 30 to 40 percent lighter.
Moisture meters can help, but calibrate yours. Compare readings in plain water and in known dry mix so you know what your numbers really mean.
Aim to water when the top 30 to 50 percent of the mix dries. Peace lilies hate sitting in a saturated pot.
9 Common Causes and Easy Fixes
1. Chronic Overwatering and Oxygen-Starved Roots
What you see:
- Leaves droop and sometimes curl downward
- Mix stays wet for many days
- Old leaves yellow first
Why it happens: Water pushes air out of the potting mix. Root hairs need oxygen to move water into the plant. In saturated conditions, they collapse, so the plant wilts even though the soil is wet.
What to do now:
- Pause watering until the top half of the mix dries.
- Improve airflow and warmth. A small fan on low across the room helps dry the mix.
- Empty any water in the saucer after 10 minutes.
- If the pot is still heavy after 5 to 7 days, see cause 3 about drainage and cause 8 about compacted mix.
How to prevent: Water thoroughly, then wait. In bright indoor light, many peace lilies like watering every 7 to 10 days in warm months and less often in winter. Always let the top layer dry before watering again.
2. Root Rot from Fungi Like Pythium or Phytophthora
What you see:
- Strong musty smell from the soil
- Brown or black roots that feel soft or slough off
- Droop doesn’t improve after you stop watering
Why it happens: Constant moisture lets rot pathogens multiply. Damaged roots can’t move water, so the plant wilts even in wet soil.
What to do now:
- Unpot gently. Rinse soil off the roots with lukewarm water.
- Sterilize shears with alcohol. Trim all mushy roots back to firm, white tissue.
- Wash the old pot with hot, soapy water, then soak 10 minutes in a 10 percent bleach solution. Rinse and dry.
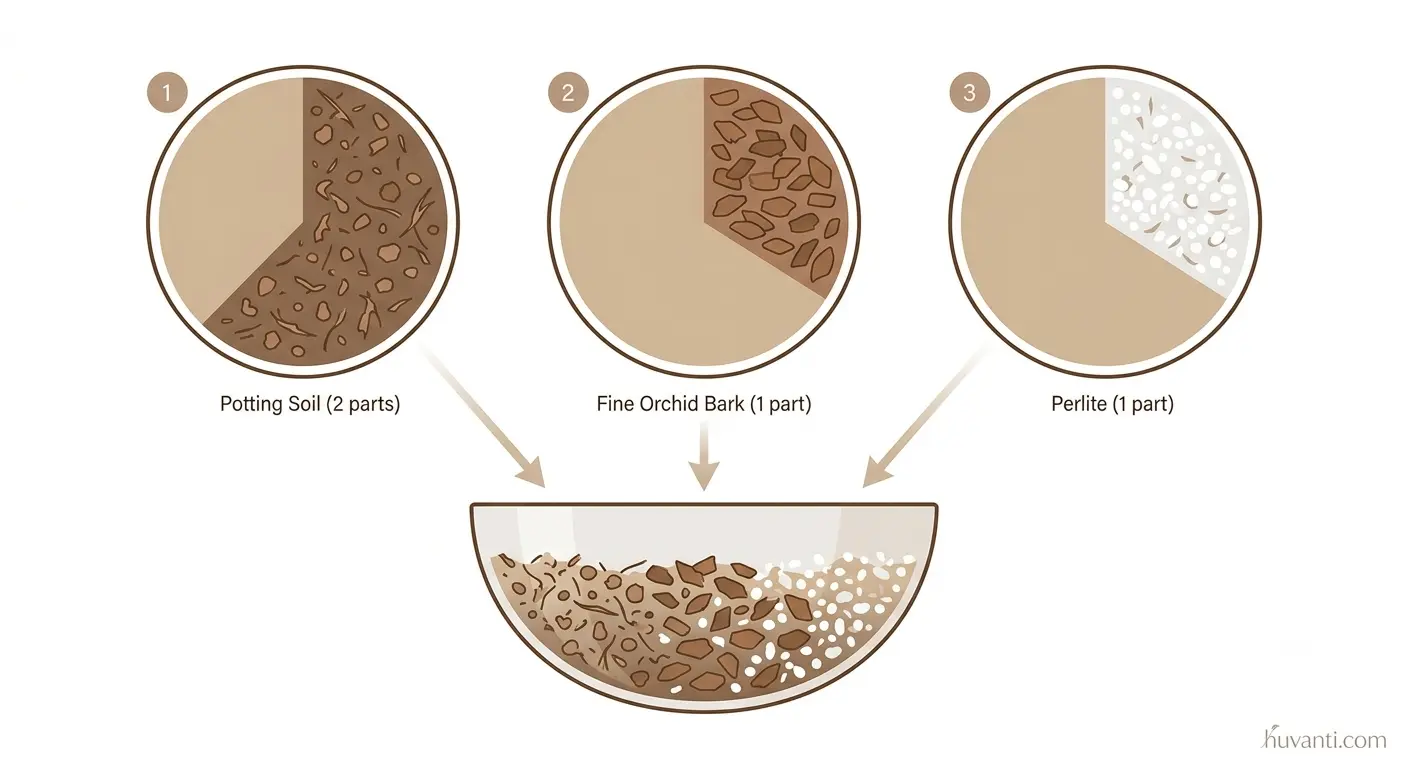
- Repot in a fresh, airy mix. A reliable blend is 2 parts high-quality potting mix, 1 part fine orchid bark, and 1 part perlite.
- Water once to settle the mix. Then wait until the top 1 to 2 inches are dry before watering again.
- Keep the plant warm and in bright, indirect light. Don’t fertilize for 4 weeks.
Optional step: If the rot was widespread, you can apply a fungicide labeled for root rot on houseplants. Follow the label exactly.
How to prevent: Use a free-draining mix, never leave the pot in standing water, and adjust watering to the light and temperature you have.
3. Poor Drainage or Blocked Holes
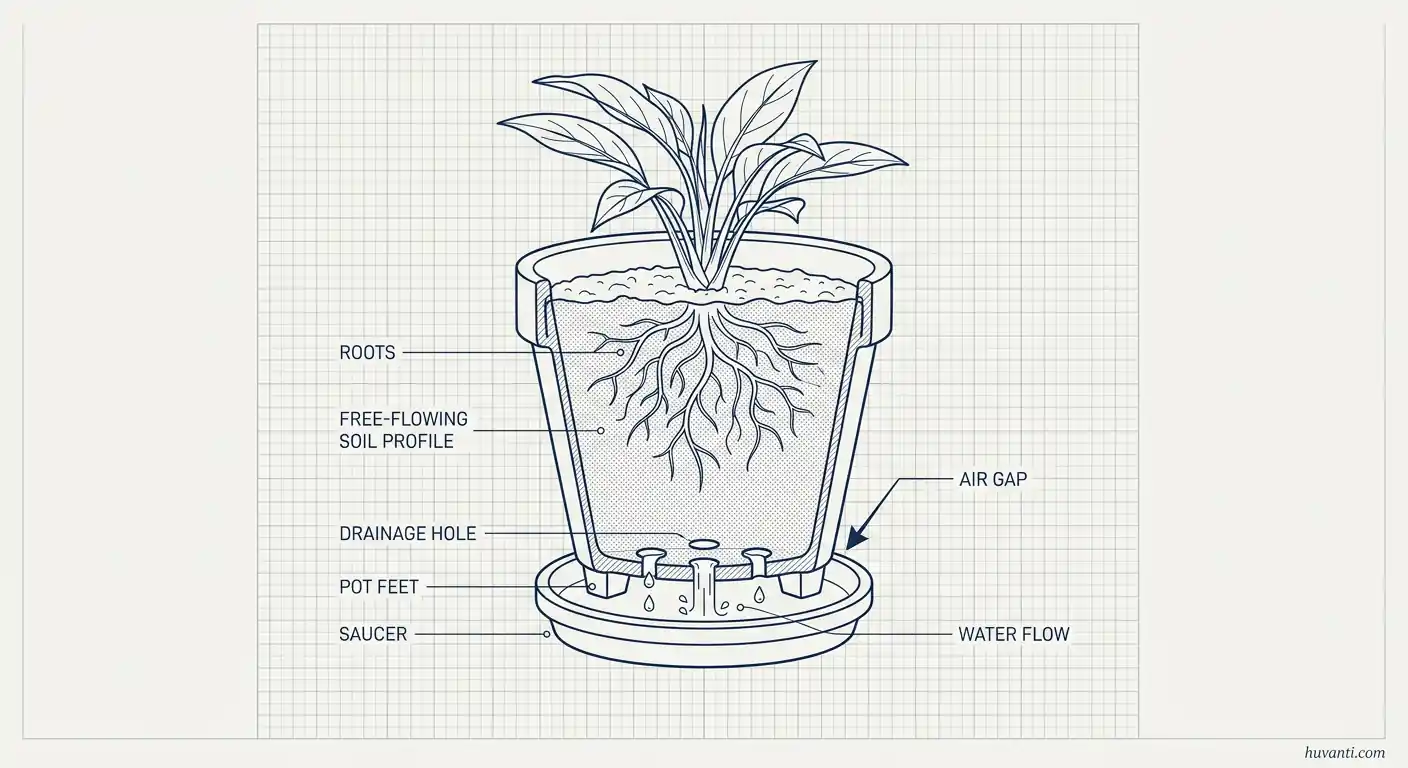
What you see:
- Water pools in the saucer
- Soil surface stays shiny wet
- Pot feels heavy long after watering
Why it happens: If the pot has no holes or the holes are blocked by roots or debris, water can’t escape and the root zone stays saturated.
What to do now:
- Confirm the pot has open holes. If not, change to a pot with holes.
- Elevate the pot on pot feet so air can reach the holes.
- Break up a compacted layer at the bottom. Don’t add a gravel layer. That raises the perched water table and keeps roots wetter, not drier.
How to prevent: Choose a pot with several holes. If you like a decorative cachepot, keep the nursery pot inside it and empty any pooled water after each watering.
4. Pot That Is Too Large for the Root Ball
What you see:
- Large volume of wet mix with a small root system
- Droop after a recent repot into a much bigger pot
Why it happens: A big volume of mix holds more water than the roots can use. The core stays wet for too long and oxygen drops.
What to do now:
- Repot down to a container only 2 to 5 centimeters wider than the current root ball.
- Use an airy mix and firm it gently to remove large voids, without compacting.
How to prevent: Step up pot size gradually. Peace lilies prefer snug but not root-bound quarters.
5. Low Light Slows Transpiration
What you see:
- Plant sits far from a window or in a room you rarely light
- Soil stays wet more than 10 days
- Leaves are a darker green and thin
Why it happens: In low light, stomata stay more closed. The plant uses less water, so the pot stays wet and roots sit in a low-oxygen zone.
What to do now:
- Move the plant to bright, indirect light. Near an east window is ideal, or a few feet back from a south or west window with a sheer curtain.
- If you use a light meter app, aim for roughly 3,000 to 10,000 lux during the day.
- After the move, reduce watering until the plant starts using water faster.
How to prevent: Match watering to light. Brighter conditions mean more frequent watering. Dimmer rooms mean you wait longer between waterings.
6. Cold Stress or Cold Water Shock
What you see:
- Droop right after watering with very cold tap water
- Plant near an air conditioner, drafty window, or door
- Leaves feel cool to the touch
Why it happens: Cold constricts vessels and slows roots. Even in wet soil, water movement inside the plant drops and leaves droop.
What to do now:
- Use room-temperature water. Fill your watering can and let it sit for a few hours before use.
- Keep the plant between 65 and 85 degrees Fahrenheit (18 to 29 Celsius).
- Move it away from AC vents and winter drafts.
How to prevent: Stable warmth and tepid water keep the plant active and prevent cold slump.
7. Fertilizer Salts and Tap Water Sensitivities
What you see:
- Leaf tips brown or crispy along with droop
- White crust on the soil or pot rim
- You use softened water or feed often
Why it happens: Excess salts or minerals like fluoride and sodium can injure roots. Damaged roots can’t pull water well, so leaves wilt even in wet mix.
What to do now:
- Flush the pot. Run water slowly through the mix for several minutes to leach salts, then let it drain fully.
- If you use a water softener, switch to rainwater, distilled, or a good carbon-filtered water for your plants.
- Pause fertilizing for 4 weeks. Then resume at about one-quarter to one-half of the label rate.
- Trim only fully brown tips if you like. Partial green tissue still helps photosynthesis.
How to prevent: Feed lightly in spring and summer every 4 to 6 weeks, and flush the pot with plain water every 1 to 2 months to clear salts.
8. Dense or Compacted Potting Mix That Stays Wet
What you see:
- Water sits on the surface before sinking
- The core stays wet while the top dries into a crust
- Roots look thin and sparse
Why it happens: Fine-textured mixes pack tight over time and hold water with little air. Roots struggle, even if you water on a perfect schedule.
What to do now:
- Poke several small holes into the mix with a chopstick to improve gas exchange now.
- On your next repot, blend a chunkier mix. I like 2 parts potting soil, 1 part fine bark, and 1 part perlite.
- Consider a clay pot if your space is humid. Clay breathes and can help mixes dry evenly.
How to prevent: Refresh the mix every 12 to 18 months. Avoid garden soil in pots. Skip sand and gravel layers.
9. Fungus Gnat Larvae or Hidden Root Pests
What you see:
- Tiny black flies hover when you water
- Hairlike roots look chewed
- Persistent droop in wet soil
Why it happens: Fungus gnat larvae thrive in wet mix and feed on fine roots. Less root surface means poor water uptake.
What to do now:
- Let the top 1 to 2 inches of the mix dry out to break the life cycle.
- Place yellow sticky traps near the pot to reduce adults.
- Drench with a product that contains Bacillus thuringiensis israelensis as labeled for gnats.
- If the infestation is heavy or roots are sparse, unpot, rinse, and repot in fresh mix.
How to prevent: Keep the top layer from staying constantly wet. Bottom watering can help keep the surface drier while moistening the root zone.
Emergency Root Rescue
If your quick inspection shows lots of brown, mushy roots, do this now.
- Prepare a fresh, airy mix and a clean pot with several drainage holes.
- Unpot the plant gently. Rinse lukewarm water through the roots to remove all old mix.
- Trim dead and mushy roots back to firm tissue. Clean blades with alcohol between cuts.
- Dust cuts lightly with ground cinnamon if you want a drying aid. Don’t rely on it as a fungicide. The key is a clean repot and proper moisture.
- Pot the plant so the crown sits just above the soil line. Fill around roots and tap the pot to settle the mix.
- Water once to settle, then wait until the top 1 to 2 inches dry before the next watering.
- Place in bright, indirect light at warm room temperature. No fertilizer for 4 weeks.
Signs of recovery:
- Petioles stiffen first, then leaves lift over several days.
- New leaves appear within 3 to 6 weeks in warm, bright conditions.
Set Up a Care Routine That Prevents Future Droop
Watering That Works
- Water thoroughly. Add water until it runs from the holes. Wait, then add a bit more to ensure the whole root ball is moist.
- Drain fully. Never leave water sitting in the saucer longer than 10 minutes.
- Wait for the right dryness. Let the top 30 to 50 percent of the mix dry. In bright rooms, this might be every 7 to 10 days. In winter, it can stretch to 10 to 20 days.
- Use room-temperature water. Cold water can shock roots.
- Choose better water if needed. Rainwater, distilled, or carbon-filtered water avoids fluoride and sodium issues.
Light That Keeps the Pot from Staying Wet
- Place in bright, indirect light. Near an east window is easy. For south or west windows, use a sheer curtain or set the plant a few feet back.
- Avoid harsh midday sun that can scorch leaves.
- In low light, reduce watering. In bright light, water a bit more often.
Pot and Mix for Air and Drainage
- Pot size: Move up only one size at a time. About 2 to 5 centimeters wider than the root ball is right.
- Mix recipe: Use a chunky indoor mix. Two parts potting soil, one part fine orchid bark, one part perlite gives reliable moisture plus air.
- Pot choice: Clay breathes and helps mixes dry. Plastic holds moisture longer. Pick based on your room conditions.
- No gravel layer: It makes drainage worse by raising the water table inside the pot.
Feeding and Flushing
- Feed light. Use a balanced liquid fertilizer at one-quarter to one-half label strength every 4 to 6 weeks in spring and summer.
- Pause in winter when growth slows.
- Flush with plain water every 1 to 2 months to wash out salts.
Temperature and Humidity
- Keep between 65 and 85 degrees Fahrenheit (18 to 29 Celsius).
- Avoid cold drafts and hot, dry blasts from vents.
- Typical home humidity around 40 to 60 percent is fine. A tray with pebbles and water nearby can help if your air is dry.
Symptom Guide
Use these quick matches to pick your next step.
- Droop with wet soil and sour smell: Likely root rot. Unpot, trim, repot in airy mix.
- Droop, mix wet for 10+ days, pot feels heavy: Drainage or compacted mix. Clear holes and refresh the mix.
- Droop after a move to a darker spot: Low light. Increase light and water less often.
- Droop after using cold tap water: Temperature shock. Use room-temperature water and move away from drafts.
- Droop with brown tips and crust on soil: Salts or water quality. Flush and switch to better water.
What About Self-Watering Planters?
Peace lilies can live in self-watering pots, but only if the wick and reservoir are tuned to your light and warmth. If the mix stays constantly saturated, roots will suffer. Keep the wick only partly inserted at first, monitor the moisture, and unplug the wick or let the reservoir empty if the soil isn’t drying in the top half between refills.
How Long Until a Droopy Peace Lily Perks Up?
- Mild overwatering: Often 1 to 3 days after you let the top layer dry and increase light and airflow.
- After repot and root trim: Expect 1 to 2 weeks for leaves to firm and 3 to 6 weeks for new growth.
- After flush for salts: Within 3 to 7 days as roots resume normal uptake.
Final Thoughts
A drooping peace lily with wet soil isn’t a mystery. It is a message from the roots. Either they can’t breathe, they have been injured, or the plant is sitting in conditions that slow water use. You now have a clear path to read those signs, fix the cause, and set a routine that keeps the mix airy, the light right, and the watering just in time.
Here is the plan to remember:
- Check roots, drainage, light, and temperature.
- If roots are mushy, trim and repot in a chunky mix.
- If roots are healthy, increase light, use room-temperature water, and match watering to how fast the top half of the mix dries.
- Keep salts low and avoid standing water.
Follow that sequence and your peace lily will reward you with firm leaves, steady growth, and those classic white spathes. All information here is for educational and informational purposes only.
Frequent Asked Questions
Why is my peace lily drooping even though the soil is wet?
The roots likely lack oxygen, are damaged by rot or salts, or the plant is in low light or cold conditions that slow water movement. Check drainage, light, temperature, and root health.
Should I water a drooping peace lily if the soil is moist?
No, Don’t add more water if the mix is already moist. Find and fix the reason it is staying wet, then water only when the top portion dries.
How wet is too wet for a peace lily?
If the top inch is wet for more than 3 to 4 days or the pot stays heavy for a week, it is too wet. Let the top 30 to 50 percent dry between waterings.
What soil mix is best to prevent droop?
Use a chunky mix that holds moisture with air. Two parts potting soil, one part fine orchid bark, one part perlite keeps roots oxygenated and reduces rot risk.
Can tap water make a peace lily droop?
Yes, softened water or water high in salts or fluoride can burn roots and tips, leading to droop. Use rainwater, distilled, or carbon-filtered water if your tap is problematic.
How do I know if it is root rot?
Brown or black mushy roots with a musty smell confirm rot. Healthy roots are white or cream and firm. If rot is present, trim and repot in fresh mix.
Will more light fix drooping?
More appropriate light helps the plant use water and recover, but it won’t cure rot. Always check roots and drainage first, then adjust light.
Is misting helpful for a drooping peace lily?
Misting gives a brief humidity bump but doesn’t solve droop from wet soil. Focus on drying the mix to the correct level and improving root health. Keep leaves clean to help photosynthesis.
Do peace lilies like self-watering pots?
They can, if the wick and reservoir don’t keep the mix constantly saturated. Monitor closely. Let the top inch dry before refilling.
How often should I fertilize a stressed peace lily?
Don’t fertilize a stressed or newly repotted plant for about 4 weeks. After recovery, feed lightly every 4 to 6 weeks during active growth and flush salts regularly.