You can compost in a small apartment with no balcony. You just need the right method, a smart setup, and a simple routine. In this guide, you will learn exactly how to turn food scraps into something useful indoors with little to no smell, no mess, and no bugs.
By the end, you will know how to choose a compost method that fits your space and lifestyle, how to set it up, how to keep it odor free, and how to use the finished material for houseplants or share it with your community.
If you ever searched how to start composting in apartment no balcony and felt overwhelmed, this is your clear, step by step path.
Table of Contents
The Quick Take
If you want the fastest, least fussy indoor setup without a balcony, choose one of these:
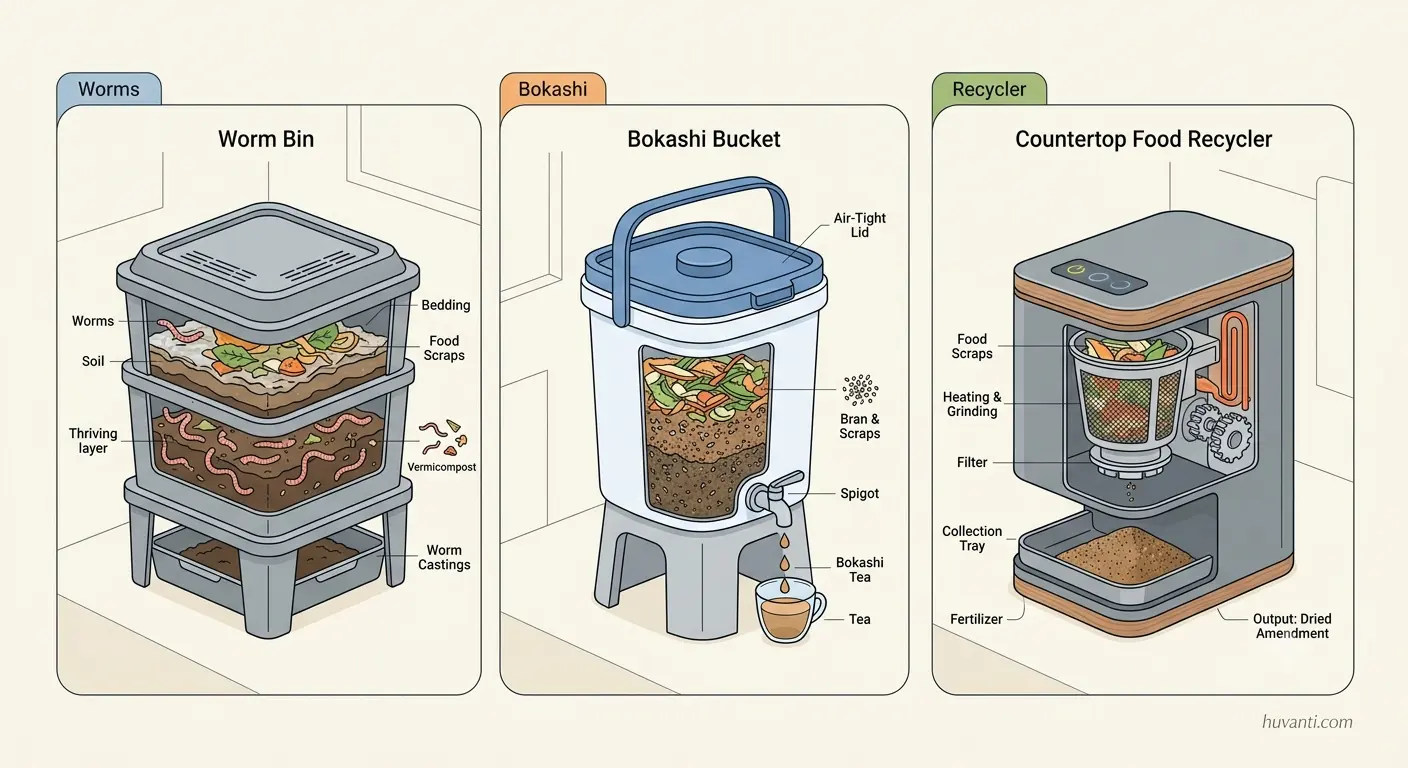
- Bokashi: Airtight bucket that ferments all food scraps, including cooked food and small amounts of meat and dairy. No smell when done right. Needs a short finishing step in soil.
- Worm bin: Ventilated bin with red wigglers that turn scraps into rich castings for houseplants. Smell free when you keep the balance right. No meat or dairy.
- Countertop food recycler: Electric appliance that dries and grinds scraps. Not finished compost on day one, but you can finish it in soil for a couple of weeks.
You can also combine methods. Many people keep a small bokashi for anything smelly and a worm bin for the rest.
The 10 Easy Steps
Step 1: Choose the Indoor Compost Method That Matches Your Life
Pick one to start. You can always add another later.
Bokashi
- Best for: People who cook a lot, want zero fruit flies, and need to handle all scraps, including cooked food and small amounts of meat or cheese.
- What it is: You pack scraps in an airtight bucket with bokashi bran, which contains effective microbes. It ferments, not rots.
- Space: A single bucket fits under a sink. Many use two buckets and rotate.
- Output: Fermented pre compost that finishes in soil in 2 to 4 weeks.
Worm bin, also called vermicomposting
- Best for: People who want living soil for houseplants and herbs, and enjoy a calm, low maintenance routine.
- What it is: Red wiggler worms live in a bedding of paper or coir and eat your fruit and vegetable scraps.
- Space: A tote or stacking tray system fits in a closet or under a desk.
- Output: Worm castings and a bit of liquid you should manage carefully.
Countertop food recycler
- Best for: People who want speed and minimal hands on time, and do not mind plugging in an appliance.
- What it is: A small machine dries and grinds scraps into a stable material in hours. It is not fully composted, so you still finish it in soil for a short time.
- Space: Lives on a counter or in a pantry near an outlet.
- Output: A dry, ground input you can mix with soil to finish.
Municipal or private pickup plus a small holding caddy
- Best for: People with tight schedules or very small apartments.
- What it is: Collect scraps in a vented caddy or freezer bag, then drop off or schedule pickup weekly.
- Space: A caddy on the counter or in the freezer.
- Output: None at home, but your scraps still become compost.
Not sure? If you want houseplant gold, start with a worm bin. If you want to toss in everything and never see a fly, start with bokashi.
Step 2: Pick a Spot and Size the System
Location matters more than gear.
- Keep it off radiators and away from direct sun. Room temperature is best.
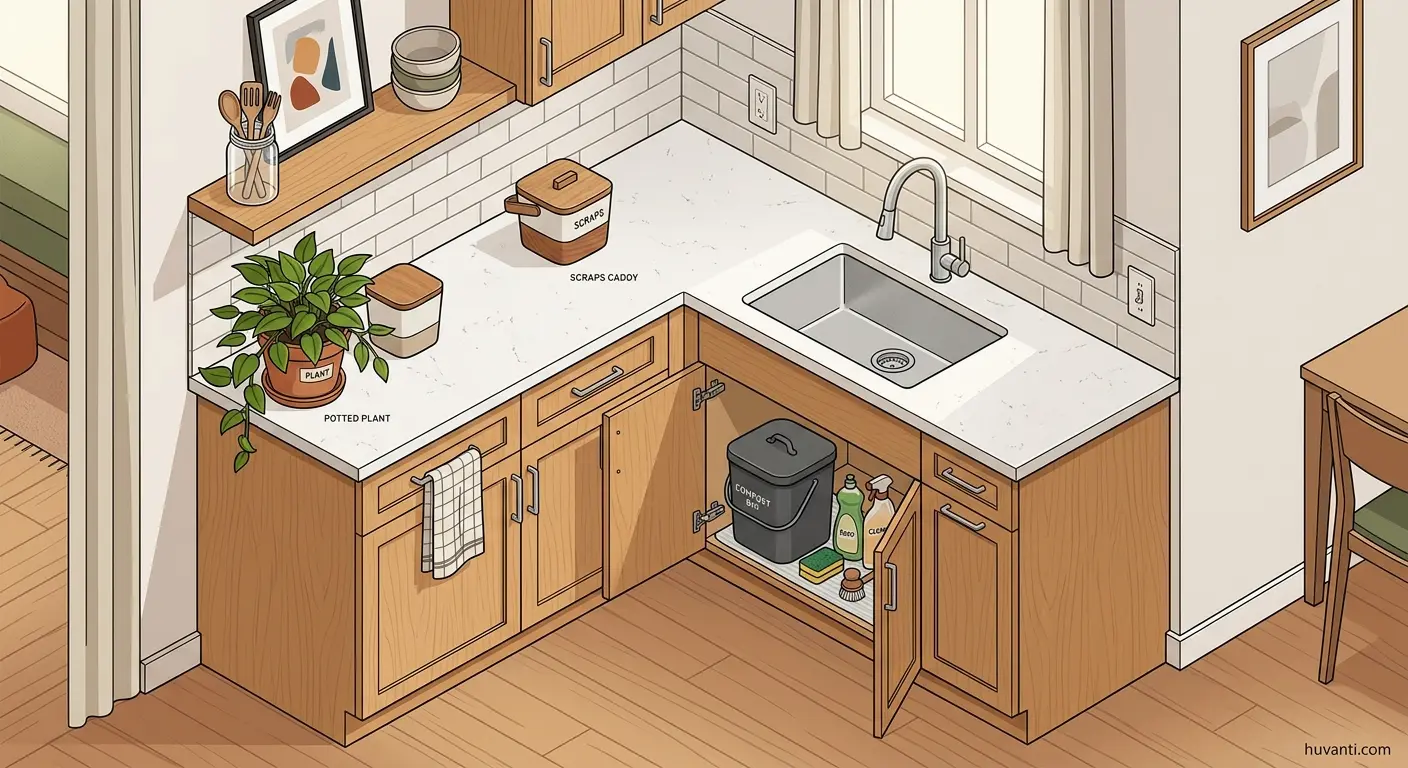
- Aim for steady conditions. Under the sink, inside a cabinet, or on a pantry floor works well.
- Protect floors with a tray or mat. Moisture happens.
- Measure your space. A common worm tote is about 50 to 70 liters. A bokashi bucket is usually 15 to 20 liters. A food recycler footprint is similar to a bread maker.
Sizing tips
- For 1 to 2 people, 1 worm bin or 2 bokashi buckets on rotation is enough.
- For 3 or more, use 2 worm bins or 2 to 3 bokashi buckets in rotation.
- Food recyclers handle a few liters per cycle. Plan a finishing container too.
Step 3: Gather Your Supplies
Get everything in one go so you can set up in under an hour.
For worm composting
- Container with ventilation and a lid, or a stacking tray system
- Bedding: shredded cardboard and paper, coco coir, or a mix
- Red wiggler worms, species Eisenia fetida or Eisenia andrei
- A small hand rake or spoon for mixing and burying
- Spray bottle of clean water
- A bin thermometer is optional but useful
- A sheet of breathable cover material, like burlap or a piece of cardboard
For bokashi
- Two airtight buckets of the same size, ideally with a spigot on at least one
- Bokashi bran or inoculated flakes
- A masher or potato press to compress scraps
- A small container to collect leachate
- A tight fitting inner plate or plastic disk to press down the surface
For countertop food recyclers
- The appliance and its included filter materials
- A lidded jar or small tub to store the output before finishing
- A finishing pot with potting mix or a storage tote with soil for finishing
For all methods
- Browns to balance greens: shredded cardboard, paper napkins, paper towels without cleaning chemicals, coco coir, dead leaves
- Scissors to cut scraps smaller
- A caddy to hold daily scraps
- Optional: carbon filter sticker or a charcoal sachet near the setup to absorb any errant smells
Step 4: Set Up Your System
Worm bin setup
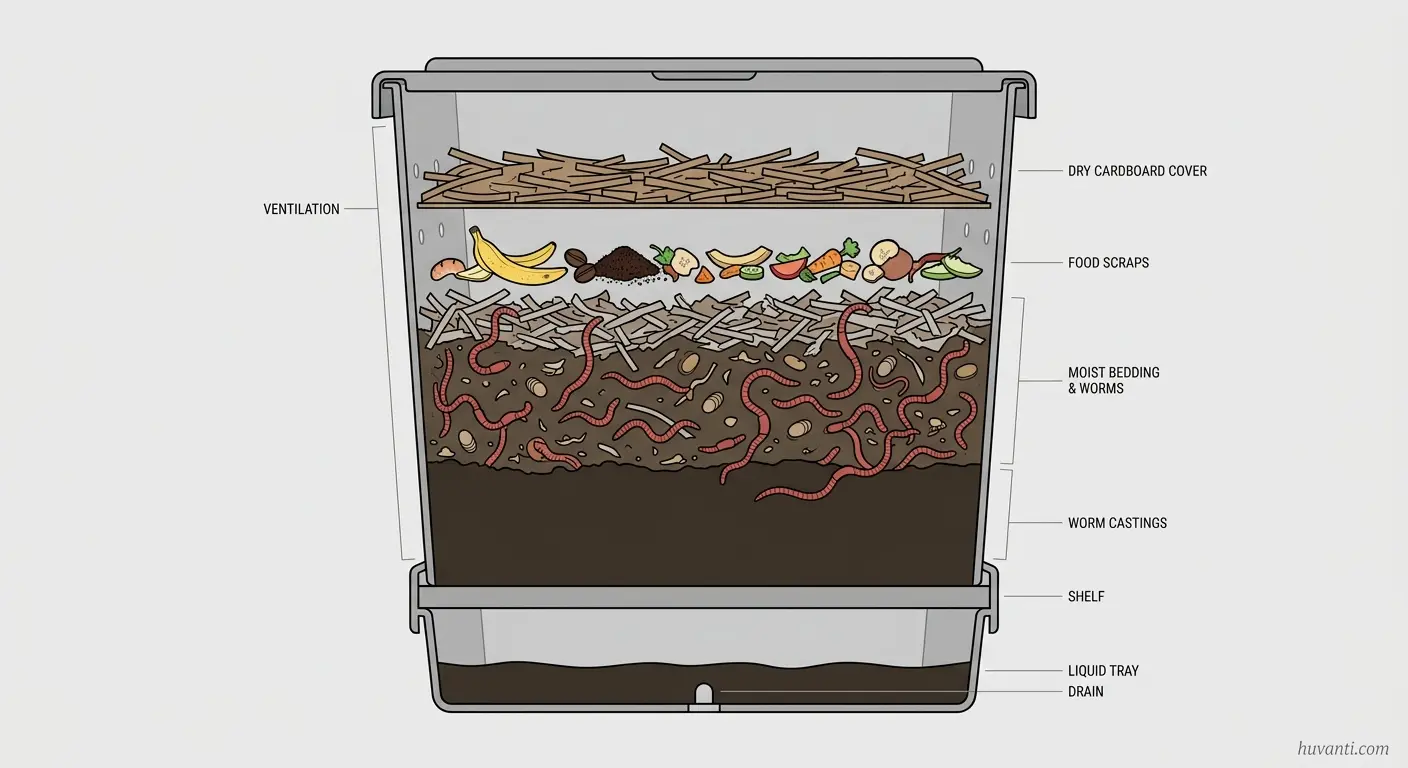
- Drill or buy a bin with air holes along the sides near the top. The lid should never be airtight. Place a tray underneath to catch any moisture.
- Add 10 to 15 centimeters of moist bedding. Squeeze a handful. It should feel like a wrung out sponge. If it drips, it is too wet. If it does not clump, it is too dry.
- Mix in a handful of crushed eggshell or garden lime to buffer acidity. Optional but helpful.
- Gently add your worms on top, then cover them with a thin layer of moist bedding.
- Lay a cardboard sheet or cloth over the surface to discourage flies.
- Let them settle for a day before feeding.
Bokashi setup
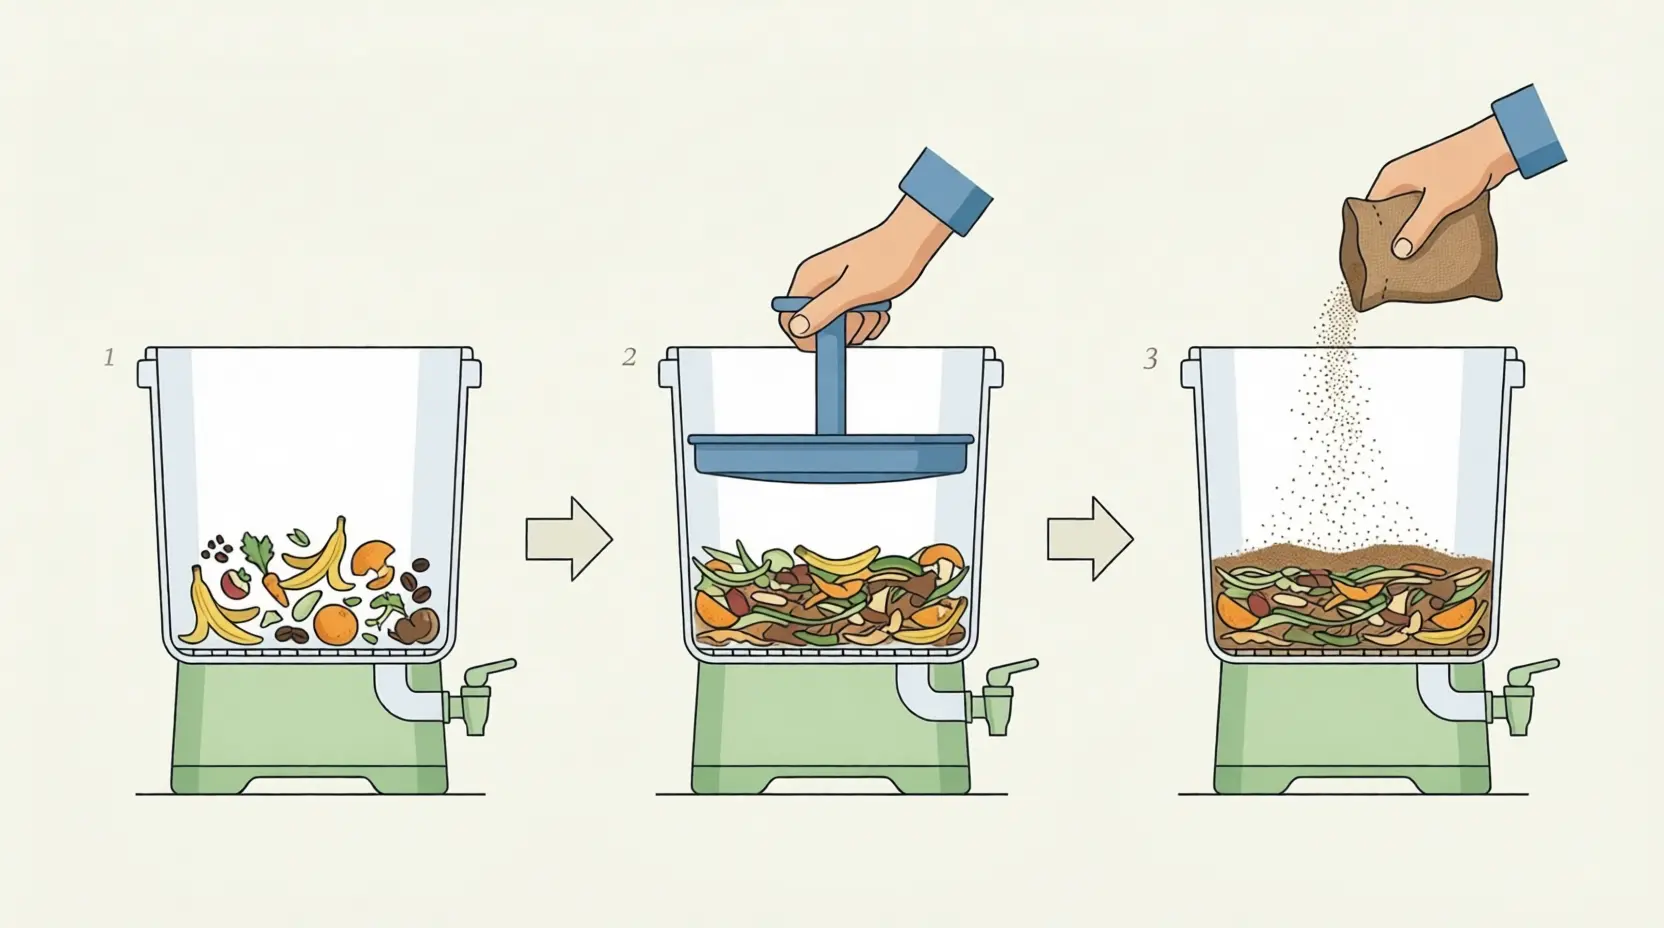
- Place a breathable mat under the bucket to catch drips. Keep the lid within reach so you close it quickly every time.
- Sprinkle a small handful of bokashi bran on the empty bottom.
- Each time you add scraps, cut them small, press them down firmly to push out air, and sprinkle a thin layer of bran over the new layer.
- Keep the surface clean. Wipe the inner walls. Press an inner plate or disk over the surface, then close the lid tightly.
- Drain leachate every couple of days. Do not let it pool in the bottom.
Food recycler setup
- Place on a stable, ventilated spot near an outlet.
- Run the initial cycle per the manual to season the chamber.
- Feed small, mixed loads for the first week. Avoid very starchy or very sugary loads until you learn how your unit behaves.
- Plan ahead for finishing. Keep a pot or tote of soil ready to receive each batch.
Step 5: Know What to Add and What to Avoid
Keep these rules and you will avoid 90 percent of problems.
For worm bins
- Good: Fruit and vegetable scraps, coffee grounds and filters, tea leaves from paper tea bags, crushed eggshells, small amounts of bread or pasta, finely chopped herbs, plant trimmings, moistened cardboard and paper
- Avoid: Meat, fish, dairy, oil and greasy foods, large citrus loads, spicy peppers, salty foods, pet waste, glossy or plastic coated papers
- Rule of thumb: 2 to 3 parts bedding browns to 1 part food by volume. Always bury food under bedding to discourage flies.
For bokashi
- Good: Anything from the kitchen, including cooked food, small amounts of meat, fish, and cheese, plus fruit and vegetable scraps
- Avoid: Large bones, large amounts of liquid soup, very moldy food, and anything with visible chemical residues
- Rule of thumb: Cut scraps small, compress well, and add a light sprinkle of bran with every layer. Keep it airtight.
For food recyclers
- Good: Most kitchen scraps cut into small pieces
- Avoid: Large bones, hard pits, or things the manual flags as unsafe for blades or sensors
- Rule of thumb: Alternate wet and dry items for even drying. Expect to finish the output in soil for 2 to 4 weeks for plant safety.
Step 6: Stop Smells and Bugs Before They Start
Composting indoors should not smell bad. If it does, something is off and easy to fix.
Odor control basics
- Cover every fresh layer. In worm bins, bury under bedding. In bokashi, press and seal, then close the lid. In food recyclers, keep the lid closed and do not overfill.
- Keep moisture balanced. Too wet invites odor. Add dry bedding or coir until it is like a wrung out sponge.
- Keep air moving in worm bins. Gently fluff the top layer weekly.
- Keep air out in bokashi. The lid is either open while you add scraps or fully closed. There is no in between.
Fruit fly and gnat control
- Freeze scraps overnight before feeding. Thaw and feed. Freezing kills eggs.
- Keep a small container of dry shredded cardboard or coir next to the bin. Sprinkle a handful after every feeding.
- Use sticky traps near the bin if needed. Replace weekly until the cycle breaks.
- Do not leave citrus peels uncovered. Chop finely and bury deep, or feed to bokashi.
Leachate management
- Worm bin liquid can carry anaerobic compounds if the bin is too wet. Better to prevent it by keeping good bedding balance. If you collect any, do not pour on houseplants without diluting and testing on a single plant.
- Bokashi leachate is acidic. Many people dilute it at about 1 to 100 for outdoor soil. Indoors, test a very small dose on one plant or consider pouring it down the drain to help keep pipes fresh.
Step 7: Make a Routine You Can Keep
The smaller the habit, the more likely it sticks. Try this as a baseline.
Daily
- Scraps go into a countertop caddy. Chop large pieces with scissors. If fruit flies are common in your area, keep the caddy in the fridge or freezer.
- If you have a worm bin, feed a palm sized amount and cover with bedding. Rotate the feeding spot around the bin.
- If you have a bokashi bucket, pack scraps once per day, sprinkle bran, press, and seal.
- If you have a food recycler, run a cycle when the chamber is at its recommended fill.
Weekly
- Top up worm bedding if the surface looks wet or compacted. Gently fluff the top few centimeters to aerate.
- Drain bokashi leachate. Check the seal. Add bran if layers look slimy or smell sweet and alcoholic instead of pickled.
- Empty the recycler output into your finishing pot or tote and mix with soil.
Monthly
- For worm bins, do a light harvest if a corner is rich with castings or add a second tray in a stacking system.
- For bokashi, when a bucket is full, let it ferment for about 2 weeks without opening, then move it to a soil factory or bury it in a planter to finish.
Seasonal checks
- In hot seasons, keep bins away from heat producing appliances. In cold climates, do not place bins against cold windows.
- If you travel, pause feeding a week before you leave. Top the worm bin with a thick bedding cap and a small feeding of slow foods like shredded cardboard and leafy greens. Bokashi buckets can simply wait, sealed.
Step 8: Finish and Harvest Like a Pro
Bokashi finishing
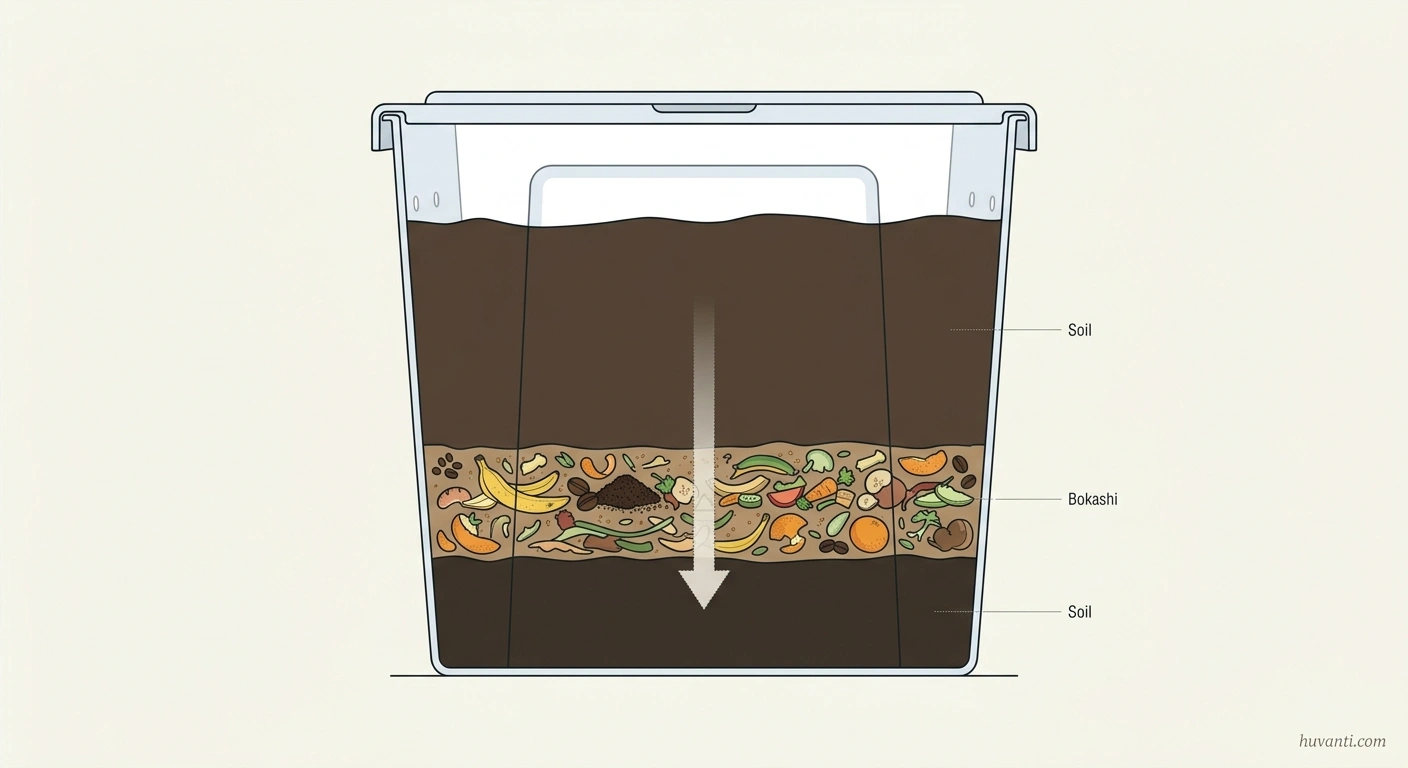
- Soil factory method: Line a tote or large planter with a layer of potting mix, add a layer of fermented bokashi scraps, then cover with twice as much potting mix. Add a little water to keep it like a wrung out sponge. Cover and let it sit 2 to 4 weeks. Scraps fade and the soil smells earthy when done.
- Planter bury method: Scrape a trench in a large planter, add bokashi scraps, cover with soil, and wait 2 to 4 weeks before planting or top dressing.
Worm bin harvesting
- Side harvest: Stop feeding one half for 2 weeks and feed only the other half. Most worms move to the food side. Scoop castings from the quiet half.
- Light method: Dump a portion of the bin onto a plastic sheet under a bright light. Worms wriggle down away from light. Gently remove castings from the top in layers, returning worms and unfinished bits to the bin.
- Stacking trays: Move the top feeding tray up and let lower trays finish. Castings in the bottom tray are usually ready.
Food recycler finishing
- Mix the dry output with potting soil at about 1 to 10 by volume. Keep it slightly moist and covered for 2 to 4 weeks before using around plants.
Storing finished compost
- Keep in a breathable bag or tub with some air holes. A sealed bucket can go anaerobic and smell sour. Lightly mist if it gets dusty dry.
Step 9: Use Your Compost Indoors
Houseplants
- Top dressing: Sprinkle 1 to 2 centimeters on the surface of pots and water in. Repeat monthly for heavy feeders like tomatoes or monsteras.
- Potting mix boost: Mix 1 part worm castings to 4 to 9 parts potting mix. More than that can be too rich for some plants.
- Seed starting: A small sprinkle of castings mixed into seed mix can improve vigor. Pure castings are too dense for seed trays.
Kitchen herbs
- Mix castings into potting soil before planting. Top dress lightly every few weeks. Keep an eye on moisture since castings hold water.
Share the surplus
- If you make more than your plants need, ask neighbors, a community garden, or local plant swap groups. Finished compost is always welcome.
Step 10: Keep It Neighbor Friendly and Scale Up Smoothly
Be a good apartment citizen
- Keep lids closed. Wipe spills right away.
- Ventilate the area with a small fan if a cabinet feels stuffy.
- If you share a kitchen, label the bin and keep the surrounding space tidy.
Scale without clutter
- Add a second worm bin or a second bokashi bucket only when you find the first one is always full.
- Combine methods for flexibility. Many people keep a small bokashi bucket for tricky items and a worm bin for the rest.
Know your local rules
- Some buildings have rules about food waste and pests. A well run indoor system will not trigger those issues, but it is worth reading your lease or building guidelines.
- If your city offers food scrap drop off, use it when you need a break or after big events.
Troubleshooting Guide
Your bin smells like rotten eggs
Too wet or anaerobic. Add dry bedding, mix gently, and bury new food deeper. In bokashi, make sure you are pressing down and sealing. Drain leachate.
You see fruit flies
Freeze scraps before feeding. Always cover with bedding. Add a cardboard sheet over the surface. Use sticky traps near the bin for two weeks.
White fuzz in bokashi
That is usually good mycelium. A tangy pickled smell means it is fermenting well. Green or black mold with a foul smell suggests too much air. Add more bran, press, and reseal.
Worms are crawling up the sides or escaping
Conditions are off. Check temperature. Keep it around room temperature. Test moisture. Add dry bedding if soggy. Avoid big acidic loads like lots of citrus. Sprinkle a little crushed eggshell to buffer pH.
Bin is too dry and slow
Mist with water until bedding is like a wrung out sponge. Add a few juicy greens like melon rinds under bedding.
You find tiny white worms
Likely pot worms. They love acidic, wet conditions. Cut back on wet foods. Add dry bedding and a pinch of crushed eggshell.
You see mites
Common and mostly harmless. If they boom, feed less, add dry bedding, and lightly aerate the top layer.
Ants moved in
Reduce dryness. Moisten bedding slightly and place bin legs in small cups of water for a few days to break the trail. Clean up any sugary spills nearby.
Compost looks muddy
Too much green material. Add shredded cardboard, coir, or dry leaves, then mix gently and pause feedings for a few days.
Smart Space Saving Setups
Under sink setup
One worm bin or a bokashi bucket on the cabinet floor. Keep a small caddy and a bag of shredded cardboard on the shelf. A shallow tray catches drips.
Closet corner
Stacking worm trays on the floor, a small fan on low for gentle airflow, and a hanging shoe organizer to store bran, scissors, and sticky traps.
Pantry plus freezer
Keep a slim caddy on the counter and a freezer bag for scraps that attract flies. Feed from the freezer when convenient. A bokashi bucket lives on the pantry floor.
Soil factory on a shelf
Use a lidded tote with small air holes for finishing bokashi or food recycler output. Label it and add a date each time you mix a new layer so you know when it is ready.
Time and Cost Expectations
Time
- Setup: About 30 to 60 minutes once you have supplies.
- Daily: 5 minutes to chop, feed, and cover.
- Weekly: 10 to 20 minutes to drain leachate or fluff the top layer.
- Monthly: 20 to 40 minutes to harvest castings or finish bokashi in soil.
Cost
- Worm bin: A simple tote, bedding, and a starter amount of red wigglers.
- Bokashi: Two buckets and bran. Bran lasts longer than you think because you use a light sprinkle per layer.
- Food recycler: Higher upfront cost and a small ongoing cost for filters and electricity.
Value
- Less trash weight and smell in your kitchen.
- Better plant health with living amendments you made yourself.
- A lighter footprint without needing a balcony or yard.
Final Thoughts
You do not need a balcony to compost well. With the right method and a steady routine, you can turn kitchen scraps into something your plants will love, keep your trash lighter, and never deal with bad smells. You learned how to pick a method that fits your space, set it up in minutes, keep it clean and pest free, finish the process the right way, and actually use what you make.
Start simple with one method and a small daily habit. If you want castings for houseplants, go with a worm bin. If you want a sealed system that accepts almost everything, go with bokashi. If you want the speed of an appliance, add a countertop recycler and finish the output in soil.
Keep it easy, keep it tidy, and enjoy watching waste turn into value on your countertop or under your sink.
Note: Everything here is educational and informational only.
Frequently Asked Questions
How do I start fast if I have zero space?
Use a bokashi bucket under the sink or a freezer bag plus a weekly drop off. You can add a worm bin later when you want castings.
Will my apartment smell?
Done right, no. Worm bins smell like damp soil. Bokashi smells faintly pickled only when you open the lid. Food recyclers smell neutral during cycles with proper filters.
Can I compost meat and dairy without a balcony?
Yes with bokashi in small amounts. Do not add them to a worm bin. If you use a food recycler, finish the material in soil before using with plants.
How long until I get usable compost?
Worm casts start to show in 6 to 10 weeks. You can harvest more generously after 2 to 3 months as the system matures. Bokashi ferments in about 2 weeks after the bucket is full, then needs 2 to 4 weeks in soil. Food recycler output needs 2 to 4 weeks in soil to finish.
What if I produce more scraps than my bin can handle?
Cut scraps smaller, feed in smaller, frequent amounts, add a second bin, or add bokashi for overflow. You can also freeze extras and drop them off weekly.
Do worms escape?
If conditions are good, they stay put. Escapes usually mean it is too hot, too wet, too acidic, or there is not enough oxygen. Fix those and escapes stop.
Can I use compost tea on houseplants?
Be cautious. Fresh leachate from a worm bin or bokashi can be anaerobic. Many houseplant keepers skip teas and simply top dress with castings or finished compost. If you experiment, test on one plant first.
Is a food recycler the same as composting?
Not exactly. It creates a stable, dried input quickly. Mix it with soil and let microbes finish the job for 2 to 4 weeks before using near plants.
What do I do with bokashi bones and shells that do not break down fast?
Crush them before adding, or sift them out later and return them to the next batch. They are excellent slow release calcium.
Can I compost onion, garlic, and citrus indoors?
Yes in moderation. Chop small and mix well into bedding for worms, or use bokashi. Large loads can slow a worm bin and attract flies if left uncovered.